Symptom: The heater sounds like crickets are living in the heater box.
The Fix:The fan motor CAN be lubricated without removing it. Get a coat hanger and bend it straight. Put the end of the hanger on the shaft and using light oil, drip some on the hanger. The drops will run down the hanger to the shaft and flow onto the shaft. Some will go into the bearing.
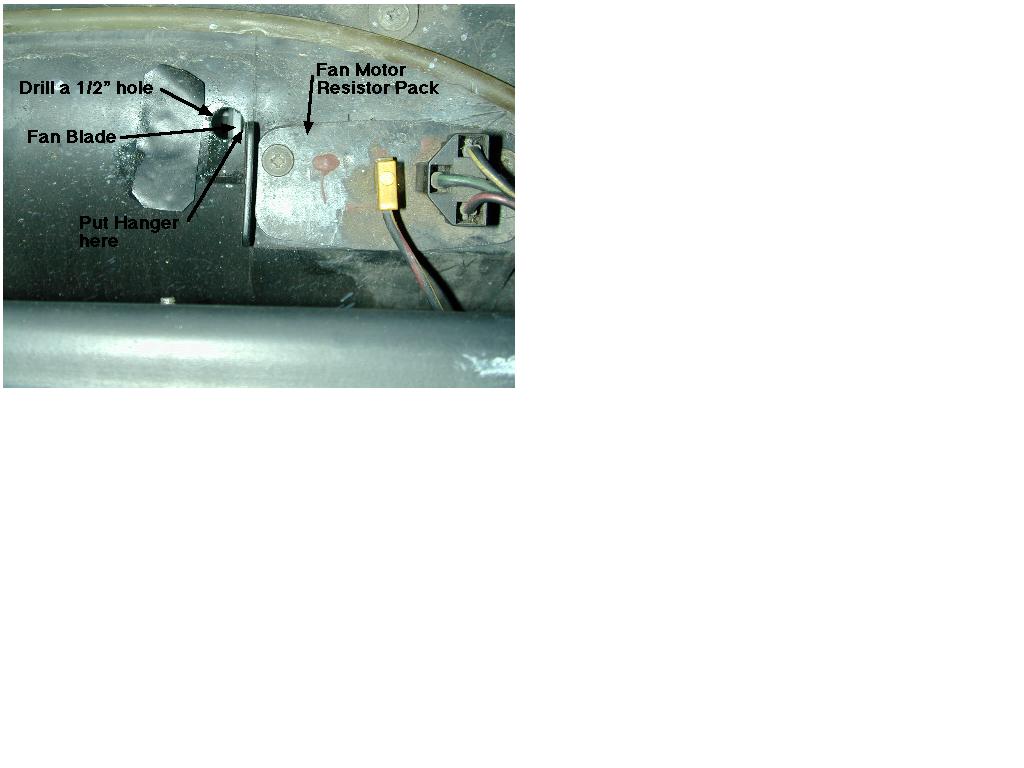
The drivers side bearing (bushing) can be lubricated by removing the resistor pack. It isn't too hard to see the shaft. Use a hanger as explained above.
The passinger side is a little trickier. Drill a 1/2 (or so) hole as shown below. The shaft is directly below the hole. Slide the hanger straight down along the side of the fan . Look through the resistor pack hole to put the hanger on the shaft. This is kind of by feel.
My Scorpio recently did some odd things and went through two blower motors, so before I ordered a new one I decided to take a close look at the old ones and see what was going on. I not only found the problem but I fixed it.
The sympton was classic "chirping" followed by a period of very loud rumbling. The cause of this is the seizure of the motor bearings onto the motor shaft. I don't think this is supposed to be repairable, but it is. Here's how.
Remove the motor from the car (you're on your own here, check the archives) and take it to a bench. Remove the squirrel cages by holding one in each hand and pulling and twisting unit one loosens and comes off. Put the exposed end of the shaft in a vice and pull of the other squirrel cage. Examining the motor shaft, you will see a plain bushing on each end of the shaft, only a little bit is exposed, the bulk of the bushing is inside the housing. Note if the shaft is turning in the bushing or if the bushing is turning with the shaft. If the bushing is not turning, this post won't help you. If the bushing is turning, read on. The motor can be saved.
If the motor still runs (even noisily), mount it in a vice (be careful, if you crush the motor it will never work again) and using a 12v power source, run the motor. Take a bit of emery cloth and clean up all the rusty areas on both ends of the shaft. Be sure to clean ALL the shaft, right to the bushing.
On the end of the motor without the brushes, remove the end place by cuttng the outer part of the stamping where the cap is locked onto the body and bend the body casing part away from the tab; do not break these off. Use a screwdrive to pry loose the end cap. Pull out the brushes from their slides and set them against the outer part of the other end of the motor. Now pull the stator out of the body of the motor.
If the brush end bushing has seized (as mine did), you will pull out the bushing along with the stator and a spring retaining clip. If its the other end the stator will come out easily, now you have to pull the end off the freed stator.
Put a drop of penetrating oil on the bushing and using a pair of plyers carefully twist the bushing until it loosens. Once loose, remove it from the shaft, clean the shaft and lubricate it lightly. Clean up the the bushing and reinstall it into the end cap, then press the spring clip back into place. This can be tricky, use non magnetic tools to guide the parts around. Reinstall the stator and slide the end cap back into place. Bend the remainder of stamped closure to hold the cap. Reinstall the brushes.
With the bushings freed, cleaned and lubricated the motor will now run well. For how long? Probably until the coldest day of the winter. I'll post the list when it dies again. In the mean time I have heat and the email address for a souce of a new motor when I need it.
Another fix for the XR blower motor is to install ball bearings
into it. I was able to install the bearing NTN 628 size 8mm x
24mm available at Grainger and use with a 1" steel tube for
a spacer, from swing set. you could also use the widely available
bearing 608 8mmx22mm with a bigger spacer. a 8mm x26mm bearing
probably would fit exactly but i never saw a listing for one.
I sliced the nippled ends so that the steel spacer would fit and
to achieve the clearances. then I tack welded the steel spacers
into the ends for better durability.